한 프로세스에서의 프로세스간 통신은 쉬운 것이므로 설명은 생략하고
외부 프로세스간 통신시에 사용하는 방법을 설명코자 합니다.
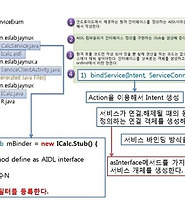
aidl은 스텁코드를 만들고자 만드는 것이고, 스텁코드는 공유하려는 대상을 바이트로 바꿔 외부에 공개해 주는 게 주역할입니다.
다음은 프로젝트의 트리 구조입니다.

우선, AIDL의 실 구현부(서버단)과 그 구현을 사용하는 클라이언트를 만들어 보겠습니다.
1. 서버단
a) 해당 프로젝트->src 에ICalc.aidl 을 만듭니다.(이 때 패키지명 추가하고 그곳에 aidl을 넣습니다.)
패키지명과 현재 aidl의 패키지명을 같게 넣지 않으면 후에 에러가 떨어집니다.
interface ICalc{
int Add(in int a, in int b);
int Mul(in int a, in int b);
int Sub(in int a, in int b);
int Div(in int a, in int b);
}
b) Service를 상속하여 MyCalcService만들고 그곳에 인터페이스 구현을 합니다.
import android.app.Service;
import android.content.Intent;
import android.os.IBinder;
import android.os.RemoteException;
import android.util.Log;
public class MyCalcService extends Service {
@Override
public void onCreate() {
// TODO Auto-generated method stub
super.onCreate();
}
@Override
public IBinder onBind(Intent intent) {
// TODO Auto-generated method stub
return mCalc;
}
@Override
public void onDestroy() {
// TODO Auto-generated method stub
super.onDestroy();
}
ICalc.Stub mCalc = new ICalc.Stub() {
@Override
public int Sub(int a, int b) throws RemoteException {
// TODO Auto-generated method stub
Log.d("maluchi", "Sub was called!!");
return a-b;
}
@Override
public int Mul(int a, int b) throws RemoteException {
// TODO Auto-generated method stub
Log.d("maluchi", "Mul was called!!");
return a*b;
}
@Override
public int Div(int a, int b) throws RemoteException {
// TODO Auto-generated method stub
Log.d("maluchi", "Div was called!!");
if(b == 0)
return 0;
return a/b;
}
@Override
public int Add(int a, int b) throws RemoteException {
// TODO Auto-generated method stub
Log.d("maluchi", "Add was called!!");
return a+b;
}
};
}
c) AndroidManifest.xml에 서비스를 추가합니다. ACTION 을 주는 이유는 외부에 공개를 하기 위함입니다.
<service android:name="MyCalcService">
<intent-filter>
<action android:name="com.android.aidldemo.CALC"></action>
</intent-filter>
</service>
2. Client 단
a) 프로젝트를 만들고 서버단의 ICalc.aidl 파일이 있는 패키지폴더를 통째로 복사하여 해당프로젝트->src에 붙여놓기 합니다.
b) bindService 및 unbindService에 등록 및 해제합니다.
c) ServiceConnection 객체를 생성하고 인터페이스 객체를 가져옵니다.
@Override
public void onClick(View v) {
// TODO Auto-generated method stub
if(mCalc == null)
return;
int id = v.getId();
int a=0, b=0;
EditText eda,edb;
EditText edResult = null;
try{
switch(id)
{
case R.id.btnadd:
{
eda = (EditText)findViewById(R.id.edadd_a);
edb = (EditText)findViewById(R.id.edadd_b);
a = Integer.parseInt(eda.getText().toString().trim());
b = Integer.parseInt(edb.getText().toString().trim());
edResult = (EditText)findViewById(R.id.edadd_result);
edResult.setText(mCalc.Add(a, b)+"");
}
break;
case R.id.btnsub:
eda = (EditText)findViewById(R.id.edsub_a);
edb = (EditText)findViewById(R.id.edsub_b);
a = Integer.parseInt(eda.getText().toString().trim());
b = Integer.parseInt(edb.getText().toString().trim());
edResult = (EditText)findViewById(R.id.edsub_result);
edResult.setText(mCalc.Sub(a, b)+"");
break;
case R.id.btnmul:
eda = (EditText)findViewById(R.id.edmul_a);
edb = (EditText)findViewById(R.id.edmul_b);
a = Integer.parseInt(eda.getText().toString().trim());
b = Integer.parseInt(edb.getText().toString().trim());
edResult = (EditText)findViewById(R.id.edmul_result);
edResult.setText(mCalc.Mul(a, b)+"");
break;
case R.id.btndiv:
eda = (EditText)findViewById(R.id.eddiv_a);
edb = (EditText)findViewById(R.id.eddiv_b);
a = Integer.parseInt(eda.getText().toString().trim());
b = Integer.parseInt(edb.getText().toString().trim());
edResult = (EditText)findViewById(R.id.eddiv_result);
edResult.setText(mCalc.Div(a, b)+"");
break;
}
}catch (RemoteException e) {
// TODO: handle exception
Log.d("maluchi","RemoteException : "+e.getMessage());
}
catch (Exception e) {
// TODO: handle exception
Log.d("maluchi","Exception : "+e.getMessage());
}
}
3. 실행방법
a) 서비스가 있는 서버를 폰에 넣고 실행합니다.
b) 클라이언트는 이클립스에서 실행합니다.
[출처] http://maluchi.com/xe/?mid=MyAndroidTips&page=5&comment_srl=27065&listStyle=gallery&sort_index=voted_count&order_type=desc&document_srl=26576